* All product/brand names, logos, and trademarks are property of their respective owners.
Rubber is widely used in UK homes and light commercial settings for practical, hard-wearing applications — from garage thresholds and workshop flooring to protective edging and anti-slip strips. It is durable, flexible and resistant to wear, making it well-suited to areas exposed to impact, moisture, or regular foot traffic. However, one of the most overlooked elements of a successful rubber installation is the adhesive used to secure it.
When the wrong adhesive is selected, problems often surface within months: lifting edges, bubbling, weakened grip, or complete bond failure. In the UK, environmental conditions such as cold temperatures, damp concrete, and fluctuating humidity levels can further influence how adhesives perform over time. Choosing the correct adhesive is not simply about strength. It is about compatibility. The base surface, level of movement, exposure to moisture, and expected traffic all influence which bonding method will deliver reliable, long-term results. Understanding how rubber behaves and how different adhesive types cure can help installers significantly extend the lifespan of their work.
Rubber’s flexibility and density make it excellent for absorbing impact and improving slip resistance. At the same time, those properties can make bonding more complex. A successful installation requires the adhesive to create both a strong mechanical grip and a stable chemical bond between the rubber and the substrate. Different surfaces demand different approaches.
Concrete is one of the most common surfaces for rubber installations in the UK, especially in garages, sheds, and utility areas. Its porosity and tendency to retain moisture create two main challenges. Porous concrete can soak up adhesive, weakening the bond, while older floors may hold hidden moisture. For smaller strips, a contact adhesive works well if applied evenly and allowed to become tacky. Flexible adhesives handle minor movement or temperature changes better. Proper preparation—cleaning, dust removal, drying, and lightly keying the surface—is essential to prevent early failure.
Wood and metal react differently to temperature and humidity changes. Wood expands and contracts, while metal can get very cold, slowing adhesive curing. Flexible adhesives that allow slight movement prevent cracking or separation. For vertical installations like door seals, careful application is key. Choosing the right adhesive for both rubber and surface ensures lasting, reliable results.
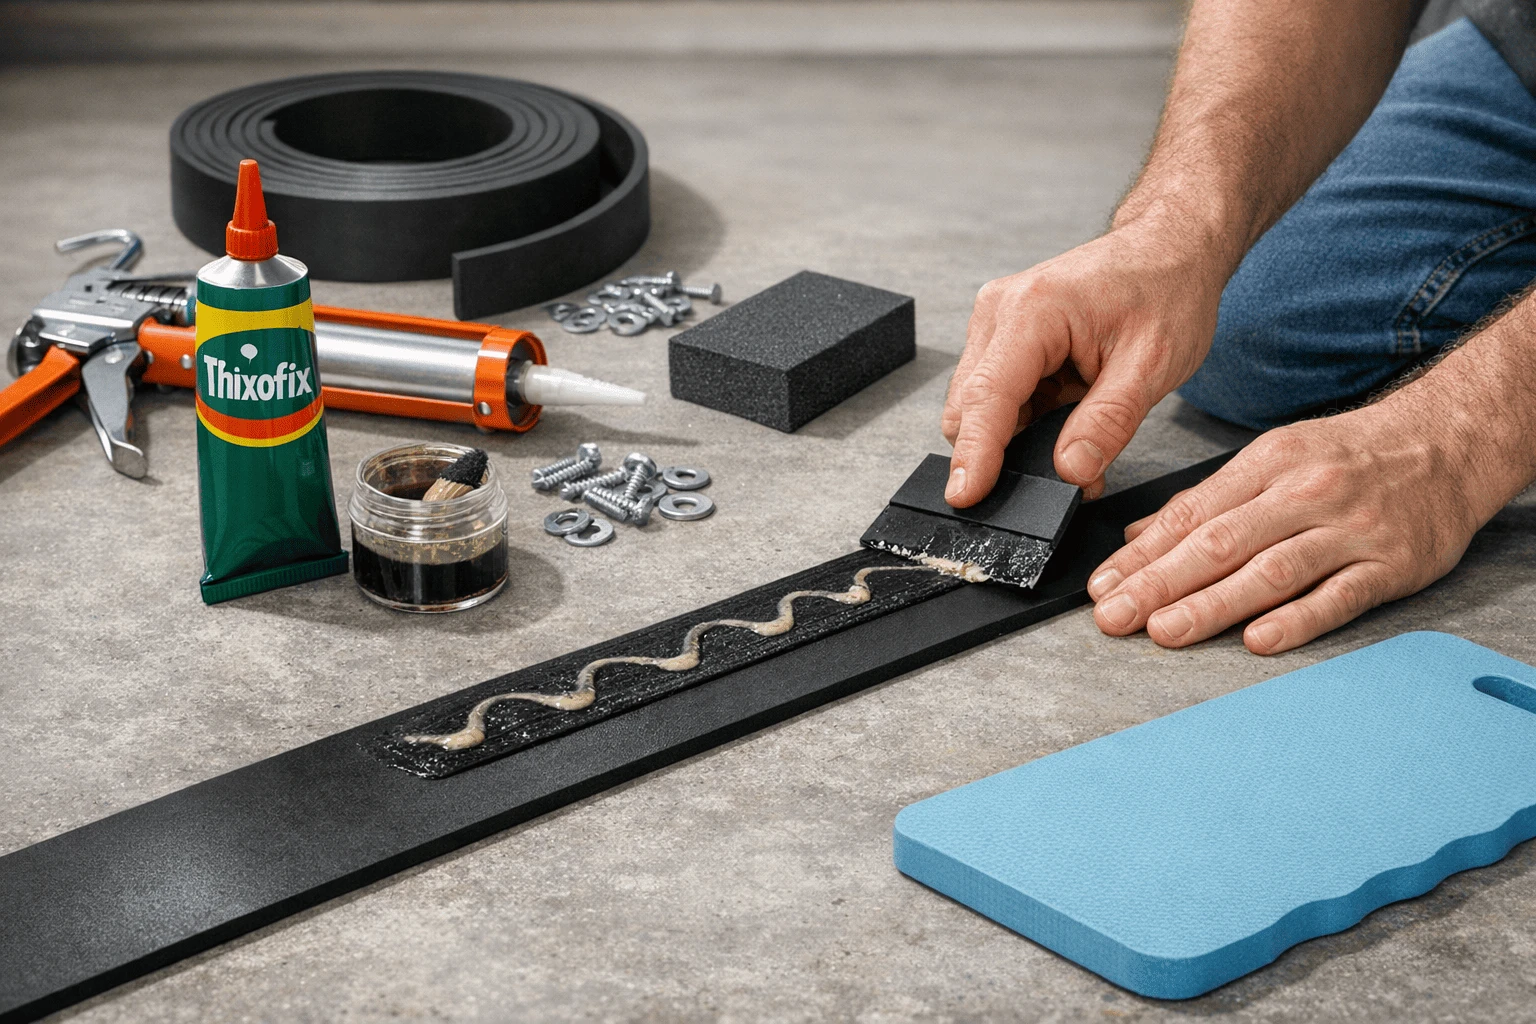
Not all adhesives behave in the same way. Two commonly used options for rubber installations are contact adhesives and hybrid sealant/adhesives. Each serves a different purpose depending on the project conditions.
Applied to both surfaces and allowed to become tacky, contact adhesives offer instant, strong bonding. They are ideal for smaller strips, vertical installations, and environments where immediate hold is required. Leveraging Adhesives & Accessories as a solution supports careful alignment, stable adhesion, and dependable long-term performance for rubber installations under controlled indoor conditions.
Hybrid sealants/adhesives combine bonding strength with flexibility. They are well suited to installations exposed to:
Temperature fluctuations
Minor structural movement
Moisture or damp environments
Heavier foot traffic
Applied using a caulking gun, these adhesives allow for a consistent bead along the bonding area. Once cured, they remain slightly flexible, helping absorb stress rather than cracking under pressure. In colder UK conditions, curing times may increase. Allowing sufficient time for setting — especially in garages or unheated outbuildings — ensures the adhesive reaches full bond strength before use.
Even the most suitable adhesive cannot compensate for poor preparation. Surface contamination is one of the most common causes of bond failure.
Before bonding rubber to any substrate:
Remove dust and debris
Eliminate grease or oil residues
Confirm the surface is completely dry
Lightly abrade smooth areas
Light abrasion, often referred to as keying, improves mechanical grip. A fine-grit preparation sponge can create a subtle texture without damaging the surface. Once complete, remove all dust before applying adhesive. Concrete floors should be checked for hidden moisture. If in doubt, allow additional drying time before installation.
Balanced application is essential. Excess adhesive can cause pooling and uneven curing, while insufficient coverage creates weak bonding points. For contact adhesives, spreading a thin, uniform layer using a plastic spreader improves consistency. For sealant-style adhesives, applying a steady bead with a caulking gun provides better control. After positioning the rubber, apply firm, even pressure along its full length. Avoid disturbing the material during curing, particularly in cooler environments. Taking time during this stage reduces the likelihood of lifting, cracking or premature wear.
Once preparation is complete and the appropriate adhesive selected, installation becomes a straightforward process.
Working methodically improves finish quality and durability. Useful tools may include:
A preparation sponge for keying surfaces
A plastic spreader for even adhesive distribution
A caulking gun for controlled bead application
A kneel pad for comfort during floor-level work
When installing longer neoprene rubber strips, using a fixing kit can assist with maintaining straight alignment across extended runs. Having suitable tools supports accuracy and reduces installation strain.
After bonding:
Press firmly along the entire length
Avoid immediate foot traffic
Follow manufacturer's curing guidelines
Cold temperatures can significantly extend curing times. If installing during winter, aim to complete the work during milder parts of the day and allow additional setting time before applying weight. Patience during curing is essential for achieving full adhesive strength.
Even well-prepared projects can fail due to small oversights.
Applying Adhesive to Damp Surfaces
Hidden moisture weakens adhesion and disrupts curing. Always confirm surfaces are dry.
Skipping Surface Preparation
Smooth or dusty substrates reduce grip. Light abrasion and cleaning improve long-term durability.
Using the Wrong Adhesive Type
Failing to account for flexibility, moisture exposure or movement can lead to cracking or lifting.
Applying Too Much or Too Little Adhesive
Balanced coverage ensures consistent bonding strength.
Ignoring Temperature Conditions
Cold garages or workshops delay curing. Allow extra time before subjecting the area to use.
Avoiding these common mistakes significantly improves the longevity of rubber installations.
Successful rubber installation depends on three key principles: selecting an adhesive suited to the environment, preparing the surface thoroughly, and allowing adequate curing time. Strength alone is not enough — compatibility and application technique are equally important. By understanding how rubber interacts with concrete, wood, and metal, and by choosing adhesives that accommodate movement and moisture where necessary, installers can greatly extend the life of their work. Careful preparation and even application reduce the likelihood of bond failure and help maintain safety and durability. A measured, informed approach ensures rubber installations remain secure and functional well into the future. For additional information on installation materials and product compatibility, further details are available at commercialstrips.co.uk.

Digital marketing & SEO professional. Expert in guest posting and content growth for UK-focused websites.
Choosing between HDPE and UHMWPE can make a big difference to how well a part performs, especially i
30 May 2026
If you’ve ever tried to fix a loose bag strap, tighten up storage in the shed, or make outdoor
19 February 2026
Floor matting plays a crucial role in UK homes and commercial spaces, often overlooked until wear, m
16 February 2026
Be the first to share your thoughts
No comments yet. Be the first to comment!
Share your thoughts and join the discussion below.